
This article should help you understand how to properly disassemble your trampoline, so you don’t have to worry about the time consuming and expensive process of removing rust, oxidation and creaking springs. When the time comes that you need your trampoline removed from your backyard, it’s best to take the proper steps to avoid any damage.
Prepare the Trampoline for Disassembly
Before you begin, Make sure to remove any people or pets from the trampoline to avoid injury during disassembly.
Tools you’ll need

An adjustable wrench (aka a crescent wrench or spanner wrench) can help you loosen bolts and nuts, although the nuts on your trampoline’s frame pieces may be too small for this to work.
A hammer can help you tap parts into place during reassembly. This might be necessary if your springs are old or the frame is bent out of shape, as the metal will not bend back into shape once it cools down.
A power drill, Phillips head screwdriver, flat head screwdriver and channel locks (aka vise-grips) are helpful if you need to disassemble any metal parts from the frame.
A spring puller – You can remove the springs by using a spring puller. This tool consists of a hook at one end and a handle at the other. The hook is placed at one of the ends of each spring, and then you simply pull on the handle to remove the springs.
Get some sturdy gloves
The most important thing you need to remember when disassembling a trampoline is that you need to protect your hands. A trampoline is made up of a lot of very sharp metal parts and can be quite dangerous.
When you disassemble a trampoline, wear thick gloves to protect your hands from cuts and scrapes as you remove screws and parts of the frame.
Remove Enclosure Net, Poles and Ladder
Disassembling a trampoline is easy to do if you follow some basic rules and precautions. Whether you are removing your trampoline for winter storage or moving it to a new location, you will need to remove the enclosure net and poles and ladder before taking apart the frame.
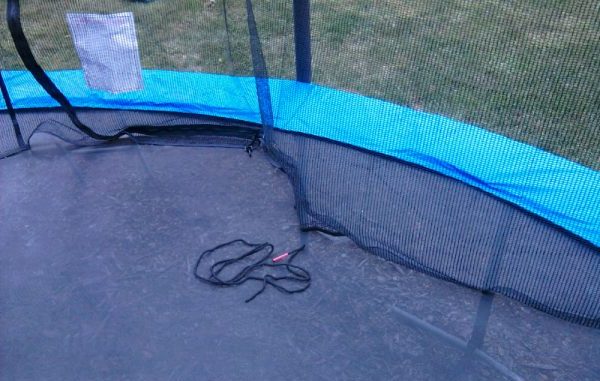
The first step in disassembling a trampoline is to remove the enclosure net, which is attached by hooks on either end of the net. After removing these hooks and unhooking the cable from the spring, lift up on the top of the net until it comes off. You should have enough slack in the cable that you can lift it right off of the spring. If not, loosen the cable until you can remove it.
With the enclosure net removed, you can now remove each pole in turn by loosening each set screw with an Allen wrench. When removing the poles, be careful not to lose any pieces that may have fallen into the holes in which they fit. Also be careful when using pliers or wrenches on set screws, because they can strip easily. If you find yourself in this situation, replace them with longer set screws from your local hardware store. Once all four poles are loose, pull them out.
Now, you can take apart the ladder. If there is rust or any formed debris, do not forget to clean. To remove rust, use any rust remover. But we recommend that you use non-toxic and water-based. It may be difficult for you to find one at first. But don’t worry, we’ve chosen one for you.
Take Apart The Safety Cover
Before you can take apart the safety cover, you must first clean it. This will prevent the cover from developing an odor, which could attract pests and make your trampoline unusable.
To clean it, soak it in a solution of one part laundry detergent to three parts water. You can use a garden hose to spray off any debris and then rinse the cover under a spigot. After rinsing, shake out as much water as possible. If you are unable to rinse all of the soap out, then you may want to put the trampoline away for a few days so that the sun can dry it out.
Disassemble the Springs
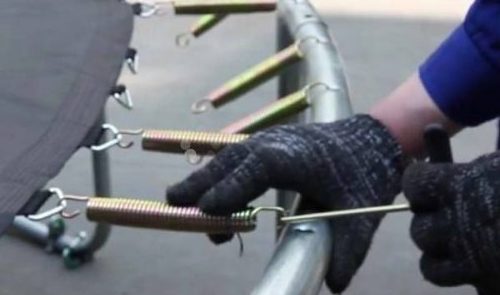
Disassembling the springs is one way to protect your trampoline during the winter. The metal coils can rust if they react with water that’s trapped in the padding and enclosure netting. If you’re planning to disassemble it, make sure you have a clean and well-lit spot for the project. (You’ll want to be able to keep an eye on the metal parts as you take them apart.)
Use a screwdriver to remove any screws from the metal frame. If there are any nuts or bolts holding it together, use your wrench to unscrew them.
Next, begin removing the individual springs. You may find them all attached together or in smaller sets of two. Take care when handling them, as they’re still quite strong and will try to spring back once you let go of them.
If you can’t get all of the springs off at once, work on one section at a time. Remove any screws or bolts that hold it together, then pull out the part you can reach. Once you’ve removed a section, you can set it aside and continue working on another part of the trampoline until all of the springs are removed.
Folding The Trampoline Mat
When you are folding the trampoline mat, it is important to make sure that there are no folds or creases in the mat. You want it to be as straight and flat as possible for safety reasons. If you have to fold over any part of the mat, it is best to do so at the supports so that you won’t create a crease or fold.
Dismantle the Frame
The frame should be dismantled in the following order:
Remove the legs from the uprights. Place them as close to each other as possible so that you can work on them without problems.
Use pliers to remove nuts and bolts connecting the legs to the uprights. The leg with a cable should be removed first using two wrenches. Grasp a nut with a wrench and turn it counterclockwise until it is unscrewed completely, then remove it with pliers. In the same way, remove all bolts holding a leg to an upright. You can also use a hammer to slightly hit a wrench to prevent damage to nuts and bolts when unscrewing them.
After removing all nuts and bolts, lower down one of the legs onto the ground and detach it from an upright by pulling out a bolt near its middle (you will have to lift up an upright). Repeat this procedure for all legs.
Conclusion
We hope that the detailed instructions we’ve provided here will allow you to safely disassemble your trampoline and avoid any damage during the process. If you own a trampoline, it’s important to remember proper maintenance in order to ensure safety and longevity of your unit. Remember that, depending on the material and brand of your trampoline, there may be unique precautions associated with its disassembly. Always consult the manual or contact the manufacturer before attempting any maintenance or repairs.